2026 Top Tile Leveling Spacers How to Choose?
Choosing the top Tile Leveling Spacers for 2026 requires more than comparing prices or colorful packaging. Installation results depend on tile format, substrate flatness, adhesive coverage, joint width, and installer technique. A spacer that works beautifully on a 600 × 600 mm porcelain floor may fail on narrow wall tiles or uneven natural stone.
Recent industry research shows why this category matters. Grand View Research continues to identify ceramic and porcelain tiles as major global construction materials, supported by renovation and residential development. Mordor Intelligence also reports steady growth in the global ceramic tiles market through the decade. These trends suggest stronger demand for faster, cleaner, and more predictable installation systems. However, market growth does not guarantee product quality.
Standards still matter.
The Tile Council of North America and ANSI A108 installation guidance emphasize proper substrate preparation, mortar coverage, movement joints, and correct setting practices. Tile Leveling Spacers can reduce lippage, but they cannot correct a badly prepared floor. That limitation is easy to overlook. Experienced installers often check the surface with a straightedge before opening the spacer bag.
Bart Bettiga, executive director of the National Tile Contractors Association, has repeatedly stressed, “There are no shortcuts to a quality tile installation.” That principle should guide every 2026 comparison. The best choice balances clip strength, wedge control, reusability, joint accuracy, and removal safety. This guide examines those details, while recognizing one uncomfortable truth: even the most advanced leveling system still depends on careful human judgment.
What Are Tile Leveling Spacers and How Do They Work?
What Are Tile Leveling Spacers and How Do They Work?
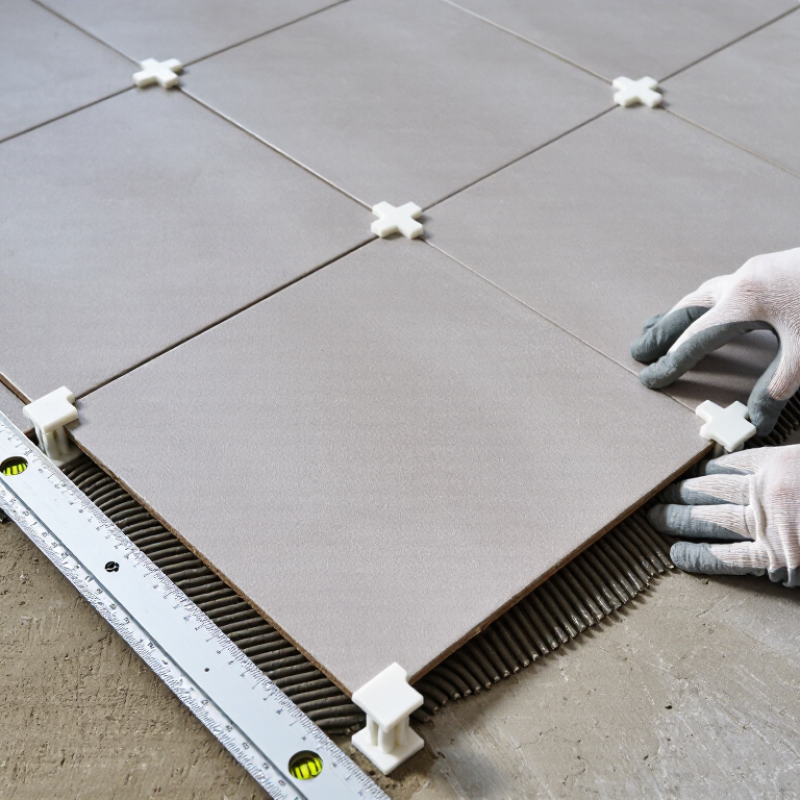
Tile leveling spacers are small installation tools that help keep neighboring tiles at the same height. They usually include a clip and a reusable wedge or cap. The clip sits beneath the tile edges, while the wedge applies gentle pressure from above. This pressure reduces lippage, which is the uneven height between adjoining tiles.
During installation, place clips along the tile edges and near corners when recommended by the system instructions. Set the next tile into the adhesive, then insert the wedge or cap. Adjust it carefully until both surfaces feel even. The spacer also helps maintain a consistent grout joint, such as 2 mm or 3 mm. However, it cannot correct a weak substrate or badly spread adhesive. That part still depends on careful preparation. Large-format tiles often benefit from leveling systems, but they need enough support underneath.
Tips: Check the floor with a straightedge before tiling. Remove excess adhesive from the joints. Do not overtighten the wedges, because pressure can push adhesive away. Let the adhesive cure as directed, then remove the clips by striking them sideways, not upward. I have found that leveling tools improve consistency, but they are not magic. Tile edges, floor flatness, and installer judgment still matter. Sometimes a small adjustment is better than forcing perfect alignment.
2026 Top Tile Leveling Spacers: How to Choose?
Choose the leveling clip according to the tile thickness, and choose the spacer width according to the required grout joint. Typical joint widths vary by tile size, edge finish, installation area, and the tile manufacturer’s instructions. Rectified tiles commonly use narrower joints, while non-rectified tiles generally require wider joints.
How to Choose the Right Size, Material, and Spacing System?
Choosing tile leveling spacers starts with joint geometry, not package claims. The 2024 Grand View Research report valued the global ceramic tile market at about US$227.8 billion in 2023. More tile means more installation variables. Small mistakes become highly visible.
Measure the actual tile edges first. ANSI A108.02 connects grout-joint width with tile-size variation, so nominal tile dimensions are not enough. For rectified tiles, 1.5 or 2 mm spacers can create a crisp appearance. Uneven handmade tiles usually need wider joints, often 3 mm or more. Dry-lay several pieces beside a doorway. Check the visual rhythm before spreading adhesive.
Material affects control. Rigid polypropylene spacers hold a consistent gap, while flexible systems tolerate slight edge differences. For large-format tiles, use clips and reusable wedges, especially where corners rock under light pressure. ASTM installation guidance emphasizes stable, properly prepared substrates; a leveling system cannot correct a seriously uneven floor. It only reduces lippage between neighboring tiles.
The 2024 Mordor Intelligence market report projects continued ceramic-tile growth through 2029, including demand for larger formats. That trend makes spacing decisions less forgiving. I once chose narrow joints for a slightly bowed tile, and the finished wall looked crowded. It was technically neat, but visually wrong. Leave room for movement, grout, and human error. Perfect alignment is not always the best design.
How to Use, Remove, and Maintain Tile Leveling Spacers Correctly?
Choosing tile leveling spacers starts with the grout joint. Match the spacer width to the planned joint, tile thickness, and surface condition. Wider joints tolerate slight tile variation, while narrow joints demand greater accuracy. Check the packaging carefully, because some systems suit wall tiles better than heavy floor tiles. A dry layout helps reveal problems before adhesive is applied.
Place each clip beneath the tile edge, then press the neighboring tile into position. Insert the wedge by hand and tighten it until both surfaces feel level. Do not force it. Excess pressure can lift the tile or squeeze out too much adhesive. Remove adhesive from the joint immediately with a damp tool. Small mistakes become stubborn ridges after curing.
Wait for the adhesive to cure according to its technical instructions. Remove the clips with a sideways kick along the joint, not by pulling upward. A rubber mallet can help, but strike gently. Vertical blows may chip tile corners. Reusable wedges should be brushed clean, rinsed, and dried before storage. Inspect them for cracks or worn teeth. Replace damaged pieces. I have seen installers reuse weakened wedges and create uneven pressure. That shortcut rarely saves time. Keep the joints clear, and check several tiles from different angles before the adhesive hardens.